Remove Windows Phone CSS in Ionic 2/3 to save space

Lets face it, no-one uses Window Phone any more. However, in Ionic 3 there are several skins which are built in to the CSS to emulate the display of the platform that the app is running on. These are ios (iOS, apple devices), md (Material Design – Android devices and Ionic default skin) and wp (window phone). As each of these is different and affects almost all widgets, they are each responsible for roughly 25% of the CSS size of ionic (which can be big – 250kb or so).

So, as no-one uses windows phone and we don’t want to have to test multiple platforms we can easily remove it from the CSS build to save time, space and complexity.

Firstly, copy the SASS config into our custom config directory; we will use this to override the default Ionic SASS config:

mkdir config
cp ./node_modules/@ionic/app-scripts/config/sass.config.js config

Then edit your package.json file and create or add a config dictionary to it like:

    "config": {
        "ionic_sass": "./config/sass.config.js"
    },

Finally, open up config/sass.config.js, find the excludeFiles section and add the following:

  excludeFiles: [
      /\.(wp).(scss)$/i
  ],

If you don’t want to match different platforms with different Ionic themes/skins (which while nice takes quite a bit of time to fully test), you can choose to use eg the Material Design skin only by doing something like:

  excludeFiles: [
      /\.(ios|wp).(scss)$/i
  ],

CKEditor Plugin Validation for Multiple Requirements

I’ve been working on a few CKEditor plugins recently for some projects. When building the elements of a dialog you create a data structure like:

elements: [{
    type: 'text',
    id: 'book',
    label: 'Book',
    validate: CKEDITOR.dialog.validate.notEmpty( "Book field cannot be empty" ),
}]

This is great, but what if you want multiple validation criteria for example it must be a number and not empty? There are a handful of hacks and examples of this online, but looking through the code I found an undocumented (and otherwise unused) function which enables you to combine multiple validation functions:

validate: CKEDITOR.dialog.validate.functions(
        CKEDITOR.dialog.validate.notEmpty(),
        CKEDITOR.dialog.validate.integer(),
        "(Start) chapter must be a number and is required",
    ),

You can pass as many validation functions into this as you want and it will combine them, but only allows you to specify one validation message unfortunately.

Ionic 3 Page Overlay

I’ve been doing a project recently in ionic 3 (WatchEm) and I must say I’m pretty impressed. I never tried using ionic 1 as it looked like quite a lot of overhead and it wasn’t certain whether it was going to turn into a popular platform, but ionic 3 seems good, stable and is developing well.

One thing we wanted to do was to provide a help screen the first time you access each page in the app as for example some google apps do. The aim was to present an overlay which provides some textual and visual pointers as to what you can do on the page, and some hints about it.

Fortunately it wasn’t hard to do; here is the code I wrote which lets you produce flexible help pages of the format:

<ion-header>
...
</ion-header>

<overlay>
    <h2>Player Buttons and Features</h2>

    <p>
        Pressing
        <ion-icon name="ios-skip-backward"></ion-icon>
        <ion-icon name="ios-skip-forward"></ion-icon>, or using your left/right keys you can move to the next key event in the game.
    </p>
</overlay>

<ion-content>
...
</ion-content>

We’re going to produce this as a component, so create components/overlay/overlay.ts like:

import { Input, Component, ElementRef, Renderer2, AfterViewInit } from '@angular/core';
import { Storage } from '@ionic/storage';
import { NavController } from 'ionic-angular';
    
@Component({
  selector: 'overlay',
  templateUrl: 'overlay.html'
})      
export class OverlayComponent implements AfterViewInit {
    private _force :boolean = false;
        
    @Input()
    set force(val) {
        this._force = val == '' ? true : !!val;
    }   
    
    constructor( private elementRef : ElementRef, private renderer : Renderer2, private _storage: Storage, public navCtrl: NavController ) {
    }

    get storage_key() {
        return `shown-overlay-${this.navCtrl.getActive().id}`;
    }

    ngAfterViewInit() {
        // Check local storage to see if we already displayed this...
        this._storage.get(this.storage_key).then( (val) => {
            if( !val || this._force )
                this.renderer.addClass( this.elementRef.nativeElement, 'shown' )
        });
    }

    hide_overlay() {
        this._storage.set(this.storage_key, 1);
        this.renderer.removeClass( this.elementRef.nativeElement, 'shown' );
    }
}

Pretty straight forwards – if the force= attribute is set on the <overlay> tag then it will always show it (useful for debugging). Otherwise if it is the first time the page has been opened it will show and then store in localStorage to say it shouldn’t be shown again.

Next, the HTML for the component in components/overlay/overlay.html:

<ion-grid full-height (click)="$event.stopPropagation(); hide_overlay()" ion-text color=white text-center>
    <ion-row full-height align-items-center>
        <ion-col col-md-8 push-md-2>
            <ng-content></ng-content>
        
            <button ion-button>Got it</button>
        </ion-col>
    </ion-row>
</ion-grid>

Obviously feel free to do what you want here with text/layout. We call stopPropagation() in order to prevent any stuff on the main page from receiving the click, especially if you have click-handlers further up the chain eg on the body element.

Finally a bit of styling in components/overlay/overlay.scss to make it look like an overlay and handle visibility changes correctly:

overlay {
    display: none;
        
    &.shown {
        position: fixed;
        display: block;
        padding: 40px 20px;
        top: 0;
        left: 0;
        bottom: 0;
        right: 0;
        background: rgba( 0, 0, 0, 0.7 );
        z-index: 9999;
        overflow-y: auto;
        overflow-x: hidden;
    }
}

Note that the overlay must be placed outside of any <ion-content tags as they provide for automatic scrolling of their content etc which is not wanted as the overlay itself needs to scroll.

Successfully downloading big files from Dropbox via Linux command-line

Recently, someone was trying to send me a 20Gb virtual machine image over dropbox. I tried a couple of times to download using chrome, however it got to 6-8Gb and then came up with a connection error. Clicking on the resume button failed and then removed the file (!). Very strange as I didn’t have any connection issues, but perhaps a route changed somewhere. I saw a number of dropbox users complaining about this on the internet. Obviously there are other approaches such as adding to your own dropbox account and using their local program to do the sync, however because I’m just on a standard free account I couldn’t add in such a large file.

Because I was using btrfs and snapper I still had a version of the half-completed download around, and so I tried seeing if standard linux tools would be able to continue the download where it left off. It turns out that simply using wget -c enables you to resume the download (it dropped a couple of times during the download but just restarting it with the same command let the whole file download just fine. So, to download a large dropbox file even if your internet connection is a bit flakey, simply go to the dropbox download link and then paste it into the terminal (may require the ?dl=1 parameter after it) like:

wget -c .https://dl.dropbox.com/...?dl=1

Apache configuration for WkWebView API service (CORS)

Switching from UIWebView to WKWebView is great, but as it performs stricter CORS checks than standard Cordova/Phonegap it can seem at first that remote API calls are broken in your app.

Basically, before WKWebView does any AJAX request, it first sends a HTTP OPTIONS query and looks at the Access-Control-* headers that are returned to determine if it is able to access the service. Most browsers can be made to allow all AJAX requests via a simple “Access-Control-Allow-Origin: *” header, however WKWebView is more picky. It requires that you expose which methods (GET, POST, etc); and which headers are allowed (eg if you are using JSON AJAX requests you probably need to use a “Content-Type: application/json” header in your main request).

Rather than having to update your API service, you can work around this in a general way using the following Apache config:

    # Required configuration for iOS WkWEBVIEW

    # Allow any location to access this service
    Header always set Access-Control-Allow-Origin "*"

    # Allow the following headers in requests (X-Auth is a custom header, also allow Content-Type to be specified)
    Header always set Access-Control-Allow-Headers "X-Auth, content-type, origin"
    Header always set Access-Control-Expose-Headers "X-Auth"

    # Allow the following methods to be used
    Header always set Access-Control-Allow-Methods "GET, POST, OPTIONS"

    # WkWebView sends OPTIONS requests to get CORS details. Don't tie up the API service with them;
    # just answer them via apache itself
    RewriteEngine On
    RewriteCond %{REQUEST_METHOD} =OPTIONS
    RewriteRule .* - [R=204,END]

Note the last line answers any HTTP OPTIONS request with blank content and returns it straight away. Most API services would cause a lot of CPU processing just to handle a single request whether it is a true request or an OPTIONS query, so we just answer this straight from Apache without bothering to send it through to the API. The R=204 is a trick to specify that we don’t return any content (HTTP 204 code means “Success, but no content”). Otherwise if we used something like R=200 it would return a page talking about internal server error, but with a 200 response which is more bandwidth, more processing and more confusing for any users.

Using Ionic’s WKWebView Engine with standard cordova/phonegap projects

The guys at ionic have created a branch of phonegap’s WKWebView Engine (for iOS) with a number of improvements such as local AJAX request ability. This is great for ionic projects, however I wanted to see if it could be used in a standard phonegap project for which the standard WKWebView plugin wouldn’t work.

For those who don’t know, older versions of iOS had an implementation of webview which was called UIWebView. This had a number of bugs and performance issues, however because cordova/phonegap strive to maintain backwards-compatibility, it is still the default within phonegap projects. WKWebView is faster, more stable and has newer features such as IndexedDB, however it has some additional security restrictions (especially with CORS and local file loading) meaning it is not simply a drop-in replacement for UIWebView.

Installation is simple, more details can be found on the github project page, however basically just run:

cordova plugin add https://github.com/ionic-team/cordova-plugin-wkwebview-engine.git --save

and it will be included in your iOS project. Make sure that your app works (and detects it’s being run from within cordova) when the window.location is set to 'http://localhost:8080/' rather than the usual file:// path. Then, add the necessary configuration into config.xml:

<platform name="ios">
    <access origin="http://localhost:8080/*" />
    <allow-navigation href="http://localhost:8080/*" />
    <feature name="CDVWKWebViewEngine">
        <param name="ios-package" value="CDVWKWebViewEngine" />
    </feature>
    <preference name="CordovaWebViewEngine" value="CDVWKWebViewEngine" />
</platform>

However, even if you do this, when you open the test app you’ll find that you are for some strange reason unable to scroll! This is because the ionic framework doesn’t use body scrolling, it has subelements with overflow: auto set on them. However for most non-ionic apps you probably want body scrolling. Simply change add the following into the ios platform configuration section in config.xml:

    <preference name="ScrollEnabled" value="true" />

If you are accessing remote API services, you’ll also need to modify some CORS settings on your server. In my post tomorrow I’ll show you how to do this easily without increasing the load on your API service.

Tracking down Lua JSON decoding issues

I’ve recently been doing quite a bit of Lua scripting for a client wanting some PowerDNS customizations. I’ve actually grown to quite like Lua, even though it’s very simple and quick, you can do some very complex programming with it reasonably straight forwardly. I think it could perhaps be compared to a stripped-down version of Perl which is also a language that I very much like because of its incredible flexibility.

Anyway, as part of this work are wanting to look up incoming IP addresses in a table of non-overlapping IP address ranges. For high performance I recommended LMDB as I’ve used it extensively before and I know that for its quirks and tendency to crash if you mishandle any aspect of its API, it is very high performance, low over head, scales very well to multiple cores, and can do pretty much anything you ask of it.

So basically the problem was “how do we store an IP range as an indexed key in LMDB” (which is just a key-value database where all keys are b-tree indexed). In the future we may want to support IPv6, and we may also want to support IP ranges which cannot be expressed in subnet-mask representation. The solution I came up with is to store the first IP in raw binary format (ie 4 bytes for IPv4, or 16 bytes for IPv6) as the key, and then as part of the value we store the end IP address. In order to see if a given IP is within a subnet, you look up you open a cursor on the table, seek to the position of the IP you are trying. If you get a direct hit, then obviously it has found the first IP in the subnet and so you know it is valid. If it does not get a direct hit you seek back to the previous entry (this is a great feature of LMDB and is found in surprisingly few indexed key-value data store APIs, even though it should be very simple to implement). You then take the value of that, get the end IP of the range and check to see if the requested IP is within the start and end of the range.

Because we wanted a very flexible and easily extensible data storage format for the values in this table we decided to encode it all as JSON. Lua has a number of JSON decoders and lua-cjson seemed pretty quick and easy, and was also available as a pre-built ubuntu package so we went with that. As we were storing the key’s IP address in raw binary notation, we figured it would make the code-path simplest if we stored the end IP address in the same manner. So, we did this, wrote a test suite with some non-public IPv4 addresses (10.xxx and 127.xxx) and verified that it was all working correctly, and then launched the code.

A few days later we started getting some complaints from customers that some IP addresses in their network ranges were not being identified correctly. But when we added the exact same details into the test suite with our private IP ranges, it clearly worked fine.

Finally I started trying to use the exact IP addresses that the customers were reporting issues with in the test scripts and discovered that there was actually a problem. Basically, whenever a component of the address was greater than 127 and the code did not go down the direct hit code path (ie the address was part of a subnet larger than a /32 and not the first entry) the decoded end IP address would be incorrect. Very strange! So, our test code which was using ranges like 127.0.0.1-127.1.2.3 worked fine, but an IP range like 1.0.0.0-1.0.129.0 would fail!

Looking more closely at the cjson Lua documentation I saw the line “cjson.decode will deserialise any UTF-8 JSON string into a Lua value or table”. And reading through the C code I saw that the routines were hard-coded to treat any JSON escaped \uXXXX value that was greater than 127 as part of a UTF-8 encoded character. This is because Lua uses the platform’s underlying char[] to store strings which means usually each character in a string can only be 8-bits, meaning that in order to store wider characters the bytes need to be encoded into a single character which is what UTF-8 is for. With our encoding we knew that all parts of the string would fit into 8-bits, but there was no way to tell the decoder this. Because cjson is aiming to be a fast module, this is all hard-coded and there is no way that I could see to easily work around this utf-8 decoding. We tried some other Lua JSON modules but they either had the same problem, or were orders of magnitude slower than cjson.

Eventually a colleague suggested just hex-encoding the end IP address prior to including it in the JSON data which was the simplest solution we could find. It should also reduce the storage required for an IP address as assuming 50% of the characters are usually encoded with a \uXXXX escape sequence in JSON, an average IPv4 address would take 14 bytes in the database, whereas with hex this would be a fixed 8 bytes per IPv4 address.

If the encoding program had been using perl we could probably have used some of the features of the JSON::XS module (specifically, the utf8 flag) to write characters directly as bytes into the string, which although is perhaps not technically valid JSON, from my reading of the Lua module should have bypassed the UTF-8 encoding of escaped values. However we wern’t using perl in our encoding routines so this wasn’t possible.

Angular 4 API service with automatic retries and Ionic 3 integration

In the bad old days of the web, you’d submit a form and if there was a problem with your internet connection it would loose the form and display an error page in the browser. These days you don’t need to worry about this quite so much, but handling errors with sending AJAX form-submits or other API requests is still a difficult topic. Fortunately, the way that Angular 4 uses Observables makes retrying requests quite a bit easier.

In the app I was building for a client recently, we wanted the default process flow to be as follows. Any API request should display a spinner (via Ionic 3), and send the request to the server. If we got an error like login failure then it should return this error to the client. If the error is with the network connection timing out it should automatically retry a couple of times. For other errors such as internal server (ie API side) or not connected at all, it should fail straight away. However if it was an API or network connection failure, it should display a popup prompting the user to opt to retry or cancel the request (eg ‘Turn your internet connection on and hit retry’) rather than making them hit a form resubmit button again.

As Observables remember all the data and options they were submitted with, it’s pretty easy to retry the request and there are a number of bits of code on the internet for this. However I couldn’t find any good examples of this being written in a reusable fashion, and with options of asking prompting the user without forgetting the request. So, here is an example of how you can do this within the framework of Ionic, however it should work in general for anything based on Observables especially under Angular 2+. Below I’ll walk through some of the harder parts of this code.

Create the API service (app/api.service.ts) looking like:

import { Injectable } from '@angular/core';
import { Http, Headers, Response } from '@angular/http';

import { Observable } from 'rxjs/Observable';
import { Subject } from 'rxjs/Subject';
import 'rxjs/add/operator/map';
import 'rxjs/add/operator/scan';
import 'rxjs/add/operator/do';
import 'rxjs/add/operator/delay';
import 'rxjs/add/operator/retryWhen';
import 'rxjs/add/operator/finally';
import 'rxjs/add/operator/delayWhen';
import 'rxjs/add/operator/timeout';
import 'rxjs/add/observable/throw';
import 'rxjs/add/observable/onErrorResumeNext';
 
@Injectable()
export class APIService {
  public inprogress_requests : Subject<any> = new Subject();

  public error_handler : (message :string, err:any) => Observable<any> = (err) => Observable.throw(err);

  private requests_active :number = 0;

  constructor (private http: Http) {}
 
  request(path: String, data = {}, options :any = {}): Observable<any> {
    if( !options.headers )
        options.headers = new Headers();
    options.headers.append('Content-Type', 'application/json');

    let base_url = this.config.baseApiUrl();

    let timeout = options.timeout || 10000;
    let max_retries = 'retries' in options ? options.retries : 3;

    let url = `${base_url}/api/${path}`;
    let request = this.http.post(
            url, JSON.stringify(data),
            {
                headers: options.headers,
            }
        )

        // Add a timeout and retry the request after specified time and 3
        // attempts (but only if it is a timeout error)
        .timeout(timeout)
        .retryWhen((errors) =>
            errors.scan( ( errorCount, err ) => {
                if( errorCount < max_retries && err.name == 'TimeoutError' )
                    return errors.delay(500);
                throw err;
            }, 0)
        );

    if( options.interceptor )
        request = request.do( options.interceptor );

    request = request.map(this.extractData);

    // User-visible error handler now
    if( options.auto_fail )
        request = request.onErrorResumeNext();  // enable mergeMap etc to keep working
    else
        request = request.retryWhen( (errors) =>
            errors.delayWhen( (error) => {
                let message = this.log_error(error);
                console.error( `URL was: ${url}, request body: ${stringified_data}` );
                return this.error_handler(message, error);
            })
        );

    if( !options.nonblocking ) {
        this.add_blocking_request( options.loading_msg ? { reason: options.loading_msg } : {} );
        request = request.finally( () => this.finish_blocking_request() );
    }

    return request;
  }

  private add_blocking_request(details :any = {}) {
    // Re-issue a request if the details have been updated
    if( this.requests_active++ == 0 || Object.keys(details).length ) {
        details.active = true;
        this.inprogress_requests.next( details );
    }
  }

  private finish_blocking_request() {
    if( --this.requests_active == 0 )
        this.inprogress_requests.next( { active: false } );
  }

  private extractData(res: Response) {
    // Decode errors will be handled automatically by Observable
    let body = res.json();
    return body || {};
  }

  private log_error(error: Response | any) {
    let errMsg: string;
    if (error instanceof Response) {

      // Ignore any decode errors
      let body :any = {};
      try {
        body = error.json() || {};
      } catch(e) {}

      const err = body.error || JSON.stringify(body);
      errMsg = `${error.status} - ${error.statusText || ''} ${err}`;

      // No internet, probably
      if( error.status == 0 ) {
        console.error(errMsg);
        errMsg = 'Your internet connection is offline. Please connect and hit retry';
      }
    } else {
      errMsg = error.message ? error.message : error.toString();
    }
    console.error(errMsg);
    return errMsg;
  }
}

Lets walk through some potentially confusing bits of this service.

The main request observable is the request variable, we perform actions on this (saving the result in the request variable again) as the user requests, Initially we just set the request to have a timeout (several multiples of time of the maximum time you expect the API to respond in, otherwise you may get multiple resubmissions of the same request if the API gets a bit laggy).

Then, we come to this piece of code:

        .retryWhen((errors) =>
            errors.scan( ( errorCount, err ) => {
                if( errorCount < max_retries && err.name == 'TimeoutError' )
                    return errors.delay(500);
                throw err;
            }, 0)
        );

This basically keeps a log of all the errors that occurred and each time there is an error with the request, it first checks to see how many times we already retried, and ensure that it was actually a timeout error (as opposed to an internal server error or so). If that was the case then it waits 500ms and retries, otherwise it re-throws the error which will cause the Observable to continue as an error response.

    if( options.auto_fail )
        request = request.onErrorResumeNext();  // enable mergeMap etc to keep working

If the user passes an auto_fail option to the request, we want the request to happily silently fail (perhaps we are just sending some usage stats to the server and we don’t want errors popping up about them). This basically returns a successful Observable whether or not it was actually a success so that it doesn’t short-circuit anything due to an error being raised.

However, under normal circumstances we want to raise a frontend error:

        request = request.retryWhen( (errors) =>
            errors.delayWhen( (error) => {
                let message = this.log_error(error);
                console.error( `URL was: ${url}, request body: ${stringified_data}` );
                return this.error_handler(message, error);
            })
        );

This code says to shell out to an external function (the error_handler function reference which can be set somewhere in the main code that builds the API) with the error, and expects it to return an item such as a Subject or a true/false value indicating whether the whole of the above work should be retried again or not. This is a bit messy – you should perhaps have multiple different instances of API depending on whether you want this functionality or not, but because the API is a global service and we want a standard piece of retry code I thought to put it like this. However because it needs to interact with the frontend, I set this elsewhere as I’ll show in a bit.

Finally, we want to wrapper most requests with some code to display a spinner (optionally with a message), unless it is a non-blocking request:

    if( !options.nonblocking ) {
        this.add_blocking_request( options.loading_msg ? { reason: options.loading_msg } : {} );
        request = request.finally( () => this.finish_blocking_request() );
    }

The add_blocking_request and finish_blocking_request issue an Observable message (via this.inprogress_requests) when there are requests active or when the last active request finishes, which avoids having the spinner popping on and off again every time a request is redone or a sub-request is triggered.

Finally, in the main app constructor we hook into these two Observables to do the UI-facing work (app/app.component.ts in ionic – this is ionic-specific but you should be able to replace with your own framework easily enough). Firstly, the spinner:

    // Loader needs creating each time it is displayed in ionic...
    let loader; 
    api.inprogress_requests.subscribe(
        details => {
            if( loader )
                loader.dismiss();
            loader = null;  
                            
            if( details.active ) {
                let loader_options :any = {};
                if( details.reason )
                    loader_options.content = details.reason;
                loader = loadingCtrl.create(loader_options);
                loader.present();
            }           
        }           
    );

Simple enough – if there is a loader get rid of it, and if there should be one then create it with the message. This enable us to update the message displayed easily enough although I’ve not really used this functionality much in the code I’ve written.

Finally, lets look at the dialogs presented to the user to prompt retries. This handler should be simple enough providing different dialogs and messages depending on what the error was exactly. Note that we are returning a Subject which we effectively use like a Promise to handle the asynchronous nature of user interaction with the dialog:

    // Handle errors with a popup and offer retry functionality
    api.error_handler =
        (message, error) => {
            // Just in case it is the first request..
            this.hide_splashscreen();

            let retry_subject = new Subject();
            let retry;

            // Unauthorized
            if( error.status == 401 ) {
                retry = alertCtrl.create({
                    title: 'Logged Out',
                    message: `You have been logged out and need to log in again`,
                    buttons: [
                        {
                            text: 'OK',
                            handler: () => {
                                retry.dismiss().then( () => this.navCtrl.push('login') );
                                retry_subject.error( error );
                                retry_subject.complete();

                                return false;
                            }
                        },
                    ]
                });
            } else {
                let title = 'Server Error';
                let display_message = `We got an error from the remote server: ${message}. Do you want to retry?`;

                // 400's are nicer errors - not a server code issue but a user input problem most likely
                if( error.status == 400 || error.status == 0 ) {    // 0 = no internet
                    display_message = `${message}. Do you want to retry?`;
                    title = "Error";
                }
                retry = alertCtrl.create({
                    title,
                    message: display_message,
                    buttons: [
                        {
                            text: 'No',
                            handler: () => {
                                retry.dismiss();
                                retry_subject.error( error );
                                retry_subject.complete();
                                return false;
                            }
                        },
                        {
                            text: 'Retry',
                            handler: () => {
                                retry.dismiss();
                                retry_subject.next( 1 );
                                retry_subject.complete();
                                return false;
                            }
                        }
                    ]
                });
            }
            retry.present();
            return retry_subject;
        };
Programming ESP8266 from the CHIP

The CHIP is a powerful $9 computer. I saw them online and ordered 5 of them some time ago as part of a potential home automation project, and because it’s always useful to have some small linux devices around with GPIO ability. I’ve recently been playing a lot with ESP8266 devices (more on this in some future blog posts), and I’ve been using the CHIP to program them via a breadboard and the serial port header connectors (exposed as ttyS0) and esptool.py. So far so good.

However, I want to put the CHIP devices into small boxes around the house and use something like find-lf for internal location tracking based on Wifi signals emitted from phones and other devices to figure out who’s in which room. Whilst the CHIP has 2 wifi devices (wlan0, wlan1) it doesn’t allow one to run in monitor mode while the other is connected to an AP. This means we need an extra Wifi card to be in monitor mode, and as I had a number of ESP8266’s lying around, I thought I’d write a small program to just print MAC and RSSI (signal strength) via the serial port.

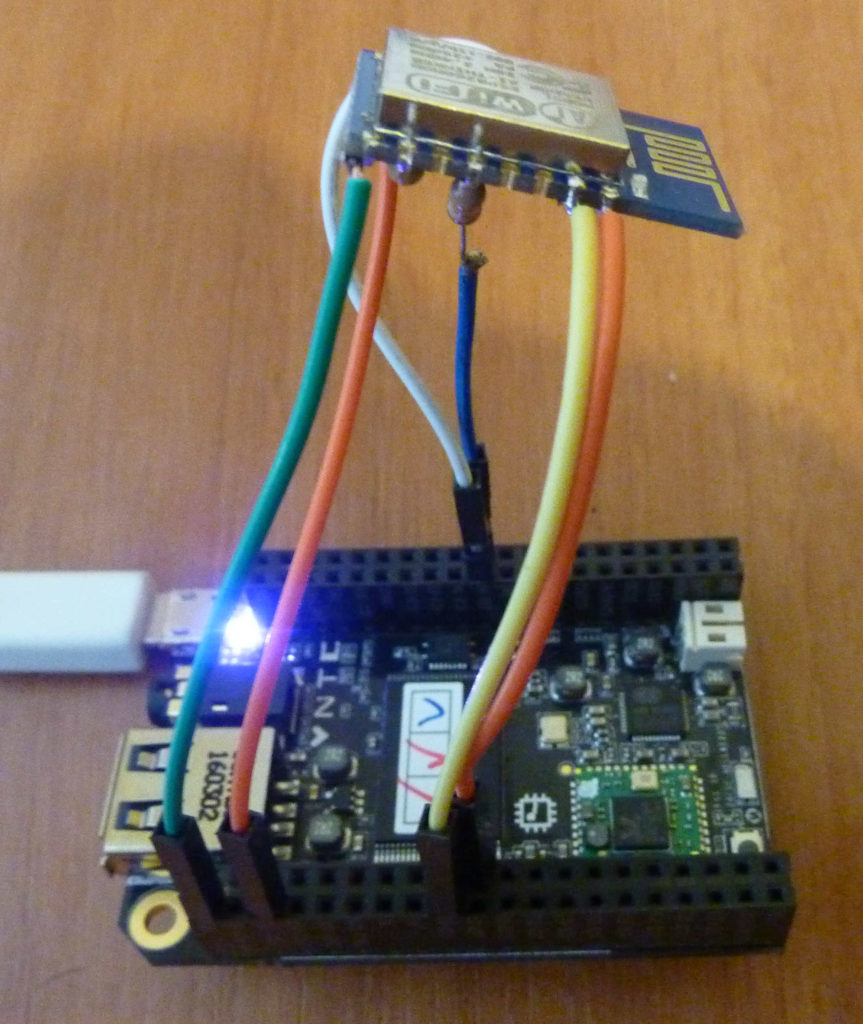
As these devices will be in sealed boxes I don’t want to have to go fiddling around with connectors on a breadboard to update the ESP8266 firmware, so I came up with a minimal design to allow reprogramming ESP8266 on-the-fly from CHIP devices (should work on anything with a few GPIO ports). Obviously the ESP8266 does have OTA update functionality, however as these devices will be in monitor mode I can’t use that. As the CHIP works at 3.3v, the same as ESP8266 chips this was pretty straight forwards involving 6 cables and 2 resistors, there were a few steps and gotchas to be aware of first though.

The main issue preventing this from working is that when the CHIP first boots up, the uBoot software listens for input for 2 seconds via ttyS0 (the serial port exposed on the header, not the USB one). When power first comes on, the ESP8266 will always output some bootloader messages via the serial port which means that the CHIP would never boot. Fortunately the processor has a number of different UARTs, a second one that is optionally exposed via the headers. You can read all about the technical details on this thread. In short, to expose the second serial port you need to download this dtb from dropbox and use it to replace /boot/sun5i-r8-chip.dtb. You then need to download this small program to enable the port and run it every boot up. This worked fine for me on the 4.4.13-ntc-mlc kernel. You can then use the pins found listed here to connect to the tx/rx of the ESP8266 serial and it won’t affect the boot-up of the CHIP.

The other nice thing about using ttyS2 rather than ttyS0 is that there are hardware flow control ports exposed (RTS, CTS) which I had hoped could be integrated into esptool to automatically handle the reset. Unfortunately it looks like esptool uses different hardware flow control ports to signal the ESP8266 bootloader mode/reboot so I had to connect these ports to GPIOs and trigger from there.

After doing this, wire the ESP8266 (I’m using the ESP-12 board, but should be the same for any other boards) to the CHIP in the following manner:

ESP8266 pin CHIP connector
VCC 3.3v
Gnd
CH_PD / EN XIO-P6
GPIO0 XIO-P7 via a resistor (eg 3.3k)
GPIO15 – via resistor (eg 3.3k)
TX LCD-D3
RX LCD-D2

Note that on some ESP boards TX/RX are the wrong way round so if you don’t see anything try flipping the cables around.


I then wrote a small program (called restart_esp.py) to trigger different mode reboots of the ESP8266 from the CHIP:

import CHIP_IO.GPIO as GPIO
import time
import sys

pin_reset = "XIO-P6"
pin_gpio0 = "XIO-P7"

def start_bootloader():
        GPIO.output(pin_gpio0, GPIO.LOW)
        GPIO.output(pin_reset, GPIO.LOW)
        time.sleep(0.1)
        GPIO.output(pin_reset, GPIO.HIGH)

def start_normal():
        GPIO.output(pin_gpio0, GPIO.HIGH)
        GPIO.output(pin_reset, GPIO.LOW)
        time.sleep(0.1)
        GPIO.output(pin_reset, GPIO.HIGH)

GPIO.setup(pin_reset, GPIO.OUT)
GPIO.setup(pin_gpio0, GPIO.OUT)
if sys.argv[1] == 'bootloader':
        print("Bootloader")
        start_bootloader()
else:
        print("Normal start")
        start_normal()

GPIO.cleanup()

Then you can easily flash your ESP8266 from the CHIP using a command like:

python restart_esp.py bootloader; \
esptool.py -p /dev/ttyS2 write_flash --flash_mode dio 0 firmware.bin; \
python restart_esp.py normal