Category Archives: Linux

Using wildcards in ssh configuration to create per-client setups

In my role as a linux consultant, I tend to work with a number of different companies. Obviously they all use ssh for remote access, and many require going through a gateway/bastion server first in order to access the rest of the network. I want to treat these clients as separate and secure as possible so I’ll always create a new SSH key for each client. Most clients would have large numbers of machines on their network and rather than having to cut and paste a lot of different configurations together you can use wildcards in your ~/.ssh/config file.

However this is not amazingly easy – as SSH configuration requires the most general settings to be at the bottom of the file. So here’s a typical setup I might use for an imaginary client called abc:

# Long list of server names & IPs
host abc-server1
hostname 10.1.2.3

host abc-server2
hostname 10.2.3.4
...

# Gateway box through which all SSH connections need routing
host abc-gateway
hostname gateway.example.org

# Generic rule to access any box on ABC's network. Eg ssh abc-ip-10.2.3.4 is the same as ssh abc-server2.
# You could also use hostnames like ssh abc-ip-foo.local assuming these resolve from the abc-gateway box.
host abc-ip-*
ProxyCommand ssh abc-gateway -W $(echo %h | sed 's/^abc-ip-//'):22

# Proxy all ssh connections via the gateway machine
host !abc-gateway !abc-ip-* abc-*
ProxyCommand ssh abc-gateway -W %h:22

# Settings for all abc machines - my username & private key
host abc-*
user mark.zealey
IdentityFile ~/.ssh/abc-corp

Using Letsencrypt with Wowza Media Server

As part of a work project, I needed to set up Wowza Media Server to do video streaming. As the webapp (which I wrote using the excellent ionic 3 framework) is running under https, it won’t accept video traffic coming from non-encrypted sources. Wowza has some pricey solutions for automatically installing SSL certificates for you, you can also purchase ones however these days I don’t see why everyone doesn’t just use the free and easily automated letsencrypt system. Unfortunately however, letsencrypt doesn’t let you run servers on different ports particularly easily, although it does have some hooks to stop/start services that may already be listening on port 443 (ssl). I happen to be using a redhat/centos distro, although I’m pretty sure the exact same instructions will work on ubuntu and other distros.

Firstly, you need to download the wowza-letsencrypt-converter java program which will convert letsencrypt certificates to the Java format that Wowza can use. Install that prebuild jar under /usr/bin.

Now, create a directory under the Wowza conf directory called ssl and create a file called jksmap.txt (so for example full path is /usr/local/WowzaStreamingEngine/conf/ssl/jksmap.txt) which lists all the domains the Wowza server will be listening on like:

video-1.example.org={"keyStorePath":"/usr/local/WowzaStreamingEngine/conf/ssl/video-1.example.org.jks", "keyStorePassword":"secret", "keyStoreType":"JKS"}

‘secret’ is not actually a placeholder; it’s the password that the wowza-letsencrypt-converter program sets up automatically so keep it as it is.

Configure SSL on the Wowza server by editing the VHost.xml configuration file (find out more about this process in the wowza documentation). Find the 443/SSL section which is commented out by default and change the following sections:

<HostPort>
        <Name>Default SSL Streaming</Name>
        <Type>Streaming</Type>
        <ProcessorCount>${com.wowza.wms.TuningAuto}</ProcessorCount>
        <IpAddress>*</IpAddress>
        <Port>443</Port>
        <HTTPIdent2Response></HTTPIdent2Response>
        <SSLConfig>
                <KeyStorePath>foo</KeyStorePath>
                <KeyStorePassword></KeyStorePassword>
                <KeyStoreType>JKS</KeyStoreType>
                <DomainToKeyStoreMapPath>${com.wowza.wms.context.VHostConfigHome}/conf/ssl/jksmap.txt</DomainToKeyStoreMapPath>
                <SSLProtocol>TLS</SSLProtocol>
                <Algorithm>SunX509</Algorithm>
                <CipherSuites></CipherSuites>
                <Protocols></Protocols>
        </SSLConfig>
        ...

Note the <KeyStorePath>foo</KeyStorePath> line – the value foo is ignored when using jksmap.txt, however if this is empty the server refuses to start or crashes.

Next, install letsencrypt using the instructions on the certbot website.

Once you’ve done all this, run the following command to temporarily stop the server, fetch the certificate, convert it and start the server again:

certbot certonly --standalone \
    -d video-1.example.org \
    --register-unsafely-without-email \
    --pre-hook 'systemctl stop WowzaStreamingEngine' \
    --post-hook '/usr/local/WowzaStreamingEngine/java/bin/java -jar /usr/bin/wowza-letsencrypt-converter-0.1.jar /usr/local/WowzaStreamingEngine/conf/ssl/ /etc/letsencrypt/live/; systemctl start WowzaStreamingEngine'

Then, in order to ensure that the certificate continues to be valid you need to set up a cron entry to run this command daily which will automatically renew the cert when it gets close to its default 3 month expiry time. Simply create /etc/cron.d/wowza-cert-renewal with the following content:

0 5 * * * root /usr/bin/certbot renew --standalone --pre-hook 'systemctl stop WowzaStreamingEngine' --post-hook '/usr/local/WowzaStreamingEngine/java/bin/java -jar /usr/bin/wowza-letsencrypt-converter-0.1.jar /usr/local/WowzaStreamingEngine/conf/ssl/ /etc/letsencrypt/live/; systemctl start WowzaStreamingEngine'

Easily setup a secure FTP server with vsftpd and letsencrypt

I recently had to set up a FTP server for some designers to upload their work (unfortunately they couldn’t use SFTP otherwise it would have been much simpler!). I’ve not had to set up vsftpd for a while, and when I last did it I didn’t much worry about needing to use encryption. So here are some notes on how to set up vsftpd with letsencrypt on ubuntu 14.04 / 16.04 so that only a specific user or two are permitted access.

First, install vsftpd:

apt install -y vsftpd

Next, you need to make sure you have installed letsencrypt. If not, you can do so using the instructions here – fortunately letsencrypt installation has got a lot easier since my last blog post about letsencrypt almost 2 years ago.

I’m assuming you are running this on the same server as the website, and you’re wanting to set it up as ftp on the same domain or similar subdomain as the website (eg ftp access direct to example.org, or via something like ftp.example.org). If not, you can do a manual install of the certificate but then you will need to redo this every 3 months.

Assuming you’re running the site on apache get the certificate like:

certbot --apache -d example.org,www.example.org

You should now have the necessary certificates in the /etc/letsencrypt/live/example.org/ folder, and your site should be accessible nicely via https.

Now, create a user for FTP using the useradd command. If you want to just create a user that only has access to the server via FTP but not a regular account you can modify the PAM configuration file /etc/pam.d/vsftpd and comment out the following line:

# Not required to be allowed normal login to box
#auth   required        pam_shells.so

This lets you keep nologin as the shell so the user cannot login normally but can log in via vsftpd’s PAM layer.

Now open up /etc/vsftpd.conf

pam_service_name=vsftpd

# Paths to your letsencrypt files
rsa_cert_file=/etc/letsencrypt/live/example.org/fullchain.pem
rsa_private_key_file=/etc/letsencrypt/live/example.org/privkey.pem
ssl_enable=YES
allow_anon_ssl=NO

# Options to force all communications over SSL - why would you want to
# allow clear these days? Comment them out if you don't want to force
# SSL though
force_local_data_ssl=YES
force_local_logins_ssl=YES
ssl_tlsv1=YES
ssl_sslv2=NO
ssl_sslv3=NO

require_ssl_reuse=NO
ssl_ciphers=HIGH

Because we’re running behind a firewall we want to specify which port range to open up for the connections (as well as port 21 for FTP of course):

pasv_min_port=40000
pasv_max_port=41000

If you want to make it even more secure by only allowing users listed in /etc/vsftpd.userlist to be able to log in, add some usernames in that file and then add the following to the /etc/vsftpd.conf configuration file:

userlist_enable=YES
userlist_file=/etc/vsftpd.userlist
userlist_deny=NO

You can test using the excellent lftp command:

lftp -u user,pass -e 'set ftp:ssl-force true' example.org/

If the cert is giving errors or is self-signed, you can do the following to connect ignoring them:

lftp -u user,pass -e 'set ssl:verify-certificate false; set ftp:ssl-force true' example.org/

Fixing Ubuntu massive internal microphone distortion

Update: It is still an issue & the same fix in ubuntu 18.04 unfortunately.

A while ago I upgrade from Ubuntu 14.10 to 16.04. Afterwards, my laptop’s internal microphone started to become massively distorted to the point that people on the other end of skype or hangouts calls couldn’t understand me at all.

Looking in the ALSA settings I noticed that the “Internal Mic Boost” was constantly being set to 100% and when I dropped this down to 0% everything went well. It seems on my laptop at least to be coupled with the “Mic Boost” which boosts both but without quite so much distortion, ie the “Internal Mic Boost” is a boost on top of the “Mic Boost” which is obviously a problem.

I couldn’t find much detail about how to configure this properly, so after some hacking around I was able to come up with the following solution. Go through every file in /usr/share/pulseaudio/alsa-mixer/paths, look for the section “[Element Internal Mic Boost]” if it is there. You should see a setting under that section like “volume = merge“. Turn that into “volume = off“. For me the files are analog-input-internal-mic.conf and analog-input-internal-mic-always.conf

To prevent it being changed later when ALSA is updated, you can run:

chattr +i /usr/share/pulseaudio/alsa-mixer/paths

I’d love to hear if there is a simpler way to work around this issue, but it works for me at least!

Successfully downloading big files from Dropbox via Linux command-line

Recently, someone was trying to send me a 20Gb virtual machine image over dropbox. I tried a couple of times to download using chrome, however it got to 6-8Gb and then came up with a connection error. Clicking on the resume button failed and then removed the file (!). Very strange as I didn’t have any connection issues, but perhaps a route changed somewhere. I saw a number of dropbox users complaining about this on the internet. Obviously there are other approaches such as adding to your own dropbox account and using their local program to do the sync, however because I’m just on a standard free account I couldn’t add in such a large file.

Because I was using btrfs and snapper I still had a version of the half-completed download around, and so I tried seeing if standard linux tools would be able to continue the download where it left off. It turns out that simply using wget -c enables you to resume the download (it dropped a couple of times during the download but just restarting it with the same command let the whole file download just fine. So, to download a large dropbox file even if your internet connection is a bit flakey, simply go to the dropbox download link and then paste it into the terminal (may require the ?dl=1 parameter after it) like:

wget -c .https://dl.dropbox.com/...?dl=1

Apache configuration for WkWebView API service (CORS)

Switching from UIWebView to WKWebView is great, but as it performs stricter CORS checks than standard Cordova/Phonegap it can seem at first that remote API calls are broken in your app.

Basically, before WKWebView does any AJAX request, it first sends a HTTP OPTIONS query and looks at the Access-Control-* headers that are returned to determine if it is able to access the service. Most browsers can be made to allow all AJAX requests via a simple “Access-Control-Allow-Origin: *” header, however WKWebView is more picky. It requires that you expose which methods (GET, POST, etc); and which headers are allowed (eg if you are using JSON AJAX requests you probably need to use a “Content-Type: application/json” header in your main request).

Rather than having to update your API service, you can work around this in a general way using the following Apache config:

    # Required configuration for iOS WkWEBVIEW

    # Allow any location to access this service
    Header always set Access-Control-Allow-Origin "*"

    # Allow the following headers in requests (X-Auth is a custom header, also allow Content-Type to be specified)
    Header always set Access-Control-Allow-Headers "X-Auth, content-type, origin"
    Header always set Access-Control-Expose-Headers "X-Auth"

    # Allow the following methods to be used
    Header always set Access-Control-Allow-Methods "GET, POST, OPTIONS"

    # WkWebView sends OPTIONS requests to get CORS details. Don't tie up the API service with them;
    # just answer them via apache itself
    RewriteEngine On
    RewriteCond %{REQUEST_METHOD} =OPTIONS
    RewriteRule .* - [R=204,END]

Note the last line answers any HTTP OPTIONS request with blank content and returns it straight away. Most API services would cause a lot of CPU processing just to handle a single request whether it is a true request or an OPTIONS query, so we just answer this straight from Apache without bothering to send it through to the API. The R=204 is a trick to specify that we don’t return any content (HTTP 204 code means “Success, but no content”). Otherwise if we used something like R=200 it would return a page talking about internal server error, but with a 200 response which is more bandwidth, more processing and more confusing for any users.

Programming ESP8266 from the CHIP

The CHIP is a powerful $9 computer. I saw them online and ordered 5 of them some time ago as part of a potential home automation project, and because it’s always useful to have some small linux devices around with GPIO ability. I’ve recently been playing a lot with ESP8266 devices (more on this in some future blog posts), and I’ve been using the CHIP to program them via a breadboard and the serial port header connectors (exposed as ttyS0) and esptool.py. So far so good.

However, I want to put the CHIP devices into small boxes around the house and use something like find-lf for internal location tracking based on Wifi signals emitted from phones and other devices to figure out who’s in which room. Whilst the CHIP has 2 wifi devices (wlan0, wlan1) it doesn’t allow one to run in monitor mode while the other is connected to an AP. This means we need an extra Wifi card to be in monitor mode, and as I had a number of ESP8266’s lying around, I thought I’d write a small program to just print MAC and RSSI (signal strength) via the serial port.

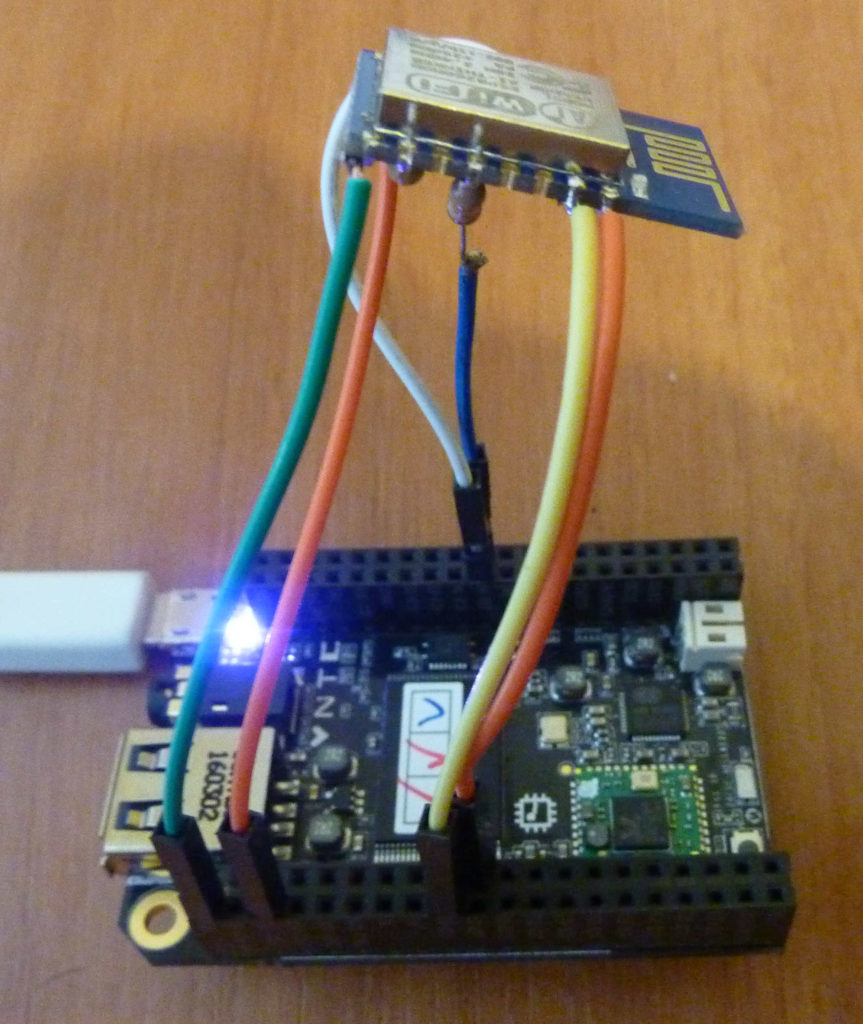
As these devices will be in sealed boxes I don’t want to have to go fiddling around with connectors on a breadboard to update the ESP8266 firmware, so I came up with a minimal design to allow reprogramming ESP8266 on-the-fly from CHIP devices (should work on anything with a few GPIO ports). Obviously the ESP8266 does have OTA update functionality, however as these devices will be in monitor mode I can’t use that. As the CHIP works at 3.3v, the same as ESP8266 chips this was pretty straight forwards involving 6 cables and 2 resistors, there were a few steps and gotchas to be aware of first though.

The main issue preventing this from working is that when the CHIP first boots up, the uBoot software listens for input for 2 seconds via ttyS0 (the serial port exposed on the header, not the USB one). When power first comes on, the ESP8266 will always output some bootloader messages via the serial port which means that the CHIP would never boot. Fortunately the processor has a number of different UARTs, a second one that is optionally exposed via the headers. You can read all about the technical details on this thread. In short, to expose the second serial port you need to download this dtb from dropbox and use it to replace /boot/sun5i-r8-chip.dtb. You then need to download this small program to enable the port and run it every boot up. This worked fine for me on the 4.4.13-ntc-mlc kernel. You can then use the pins found listed here to connect to the tx/rx of the ESP8266 serial and it won’t affect the boot-up of the CHIP.

The other nice thing about using ttyS2 rather than ttyS0 is that there are hardware flow control ports exposed (RTS, CTS) which I had hoped could be integrated into esptool to automatically handle the reset. Unfortunately it looks like esptool uses different hardware flow control ports to signal the ESP8266 bootloader mode/reboot so I had to connect these ports to GPIOs and trigger from there.

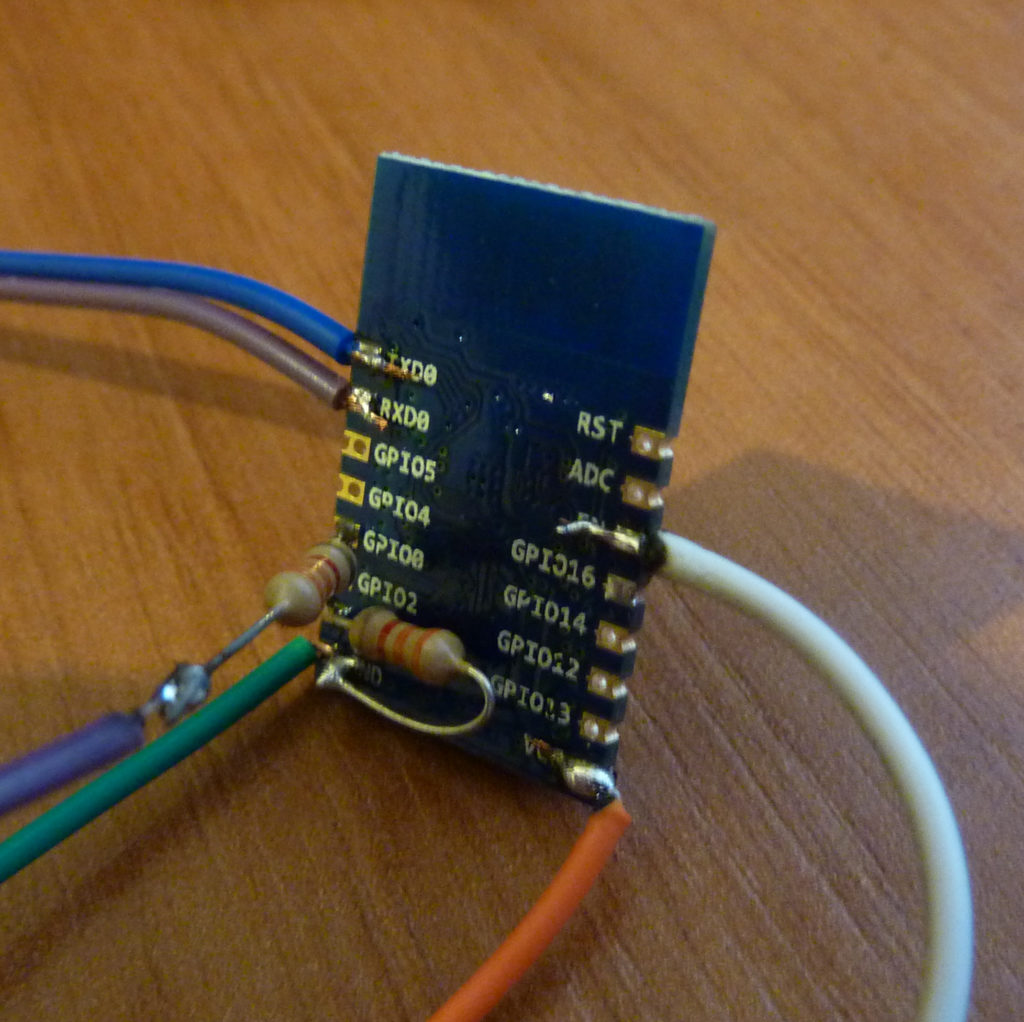
After doing this, wire the ESP8266 (I’m using the ESP-12 board, but should be the same for any other boards) to the CHIP in the following manner:

ESP8266 pin CHIP connector
VCC 3.3v
Gnd
CH_PD / EN XIO-P6
GPIO0 XIO-P7 via a resistor (eg 3.3k)
GPIO15 – via resistor (eg 3.3k)
TX LCD-D3
RX LCD-D2

Note that on some ESP boards TX/RX are the wrong way round so if you don’t see anything try flipping the cables around.


I then wrote a small program (called restart_esp.py) to trigger different mode reboots of the ESP8266 from the CHIP:

import CHIP_IO.GPIO as GPIO
import time
import sys

pin_reset = "XIO-P6"
pin_gpio0 = "XIO-P7"

def start_bootloader():
        GPIO.output(pin_gpio0, GPIO.LOW)
        GPIO.output(pin_reset, GPIO.LOW)
        time.sleep(0.1)
        GPIO.output(pin_reset, GPIO.HIGH)

def start_normal():
        GPIO.output(pin_gpio0, GPIO.HIGH)
        GPIO.output(pin_reset, GPIO.LOW)
        time.sleep(0.1)
        GPIO.output(pin_reset, GPIO.HIGH)

GPIO.setup(pin_reset, GPIO.OUT)
GPIO.setup(pin_gpio0, GPIO.OUT)
if sys.argv[1] == 'bootloader':
        print("Bootloader")
        start_bootloader()
else:
        print("Normal start")
        start_normal()

GPIO.cleanup()

Then you can easily flash your ESP8266 from the CHIP using a command like:

python restart_esp.py bootloader; \
esptool.py -p /dev/ttyS2 write_flash --flash_mode dio 0 firmware.bin; \
python restart_esp.py normal

Percent signs in crontab

As this little-known ‘feature’ of cron has now bitten me several times I thought I should write a note about it both so I’m more likely to remember in future, but also so that other people can learn about it. I remember a few years ago when I was working for Webfusion we had some cronjobs to maintain the databases and had some error message that kept popping up that we wanted to remove periodically. We set up a command looking something like:

0 * * * * mysql ... -e 'delete from log where message like "error to remove%"'

but it was not executing. Following on from that, today I had some code to automatically create snapshots of a certain btrfs filesystem (however I recommend that for serious snapshotting you use the excellent (if a bit hard to use) snapper tool):

0 5 * * 0 root /sbin/btrfs subvol snap -r /home/ /home/.snapshots/$(date +%Y-%m-%d)

But it was not executing… Looking at the syslog output we see that cron is running a truncated version of it:

May 14 05:00:02 localhost /USR/SBIN/CRON[8019]: (root) CMD (/sbin/btrfs subvol snap -r /home/ /home/.snapshots/$(date +)

Looking in the crontab manual we see:

Percent-signs (%) in  the  command,  unless  escaped
with backslash (\), will be changed into newline characters,
and all data after the first % will be sent to the command
as standard input.

D’oh. Fortunately the fix is simple:

0 5 * * 0 root /sbin/btrfs subvol snap -r /home/ /home/.snapshots/$(date +\%Y-\%m-\%d)

I’m yet to meet anyone who is using this feature to pipe data into a process run from crontab. I’m also yet to meet even very experienced sysadmins who have noticed this behaviour making this a pretty good interview question for a know-it-all sysadmin candidate!

Making a BTRFS read-only snapshot writable

For the past few years I’ve been using btrfs on most filesystems that I create, whilst it’s pretty slow on rotating disk media now that most of my hardware is SSD-based there’s not much of a performance penalty (as long as you’re not using quotas to track filesystem usage). The massive advantage is the ability to have proper snapshot history (unlike any LVM snapshotting hacks that you may suggest) going back a long time with very little overhead. With a tool like snapper (which admittedly is tricky to get set up) you can automatically rotate your snapshots and easily recover any files that you accidentally changed or deleted. Alongside always using git for code repositories, this has saved my skin repeatedly!

Anyway, by default snapper creates read-only snapshots. But when trying to diagnose some database server file corruption I recently experienced I wanted to change a btrfs snapshot from read-only to read-write so I could update some files. After spending a while looking around in the manual and on stack overflow I couldn’t see any way to do this with the kernel/toolchain versions that I was using.

Then, the solution struck me. Simply create a read-write snapshot of the read-only snapshot and work off that. Sometimes it’s very easy to look at the more complicated way of doing things and forget about some of the easier solutions that there might be!

UPDATE: For newer versions of btrfs tools you can toggle read-onlyness of snapshots by running the following command against the subvolume directory:

btrfs property set -ts /path/to/snapshot ro false

Protecting an Open DNS Resolver

As another piece of work I’ve been doing for the excellent Strongarm anti-malware team we recently converted the service so that it can be used to get instant protection wherever you are. Part of this involved my work in converting the core (customized) DNS server into an open resolver. This is usually strongly advised against as you can unwittingly become part of some very serious Denial of Service attacks, however in this blog post I show you how to implement some pretty simple restrictions and limitations to prevent this from happening so you can run a DNS open resolver without running this risk.

Here’s a copy of the article:

One of the challenges of running an open DNS resolver is that it can be used in a number of different attacks, compared to a server that is only allowed access from a known set of IPs. One of the most well known is the DNS amplification attack. As this article explains, “The fact that a DNS reply may be many times larger than a DNS query allows the attacker to achieve amplification by spoofing a relatively small query that is known to generate a large answer in response”. That means that if I can send a DNS question that takes 50 bytes, and I send it pretending to be the computer that I want to attack, and the answer to that question is 1000 bytes, then I have effectively multiplied the traffic that I can attack with by 20 times. Especially as DNSSEC (Domain Name System Security Extensions) become more common, the RRSIG and DNSKEY DNS response codes can contain a lot of data that can be used in this type of attack.

In this post, I’d like to present a couple of ways to easily protect your open DNS resolver from being involved in malware attacks like the DNS amplification attack.

Configuring a DNS Resolver

Many DNS servers, or frontends such as PowerDNS or dnsdist, have the built-in or user-configurable ability to limit some types of attacks. In the case of dnsdist, the loadbalancer sits in front of the DNS servers and monitors the traffic going to and from them in order to blacklist hosts that are abusing the platform.

However, when configuring this within Strongarm’s servers, we wanted the ultimate scalability and flexibility on our DNS infrastructure, so we decided not to use dnsdist but instead use a pure networking approach. Here are a few steps that you can take to protect your DNS infrastructure no matter whether you use a DNS loadbalancer or servers interfacing directly to the internet.

The first step you can take in protecting your server is to ensure that ANY queries cannot be used in an attack. An ANY query returns all the records of a particular domain so naturally it returns more data than a standard query. This is usually easy to configure with an option like ‘any-to-tcp’ in PowerDNS. This setting says that if the recursive server receives an ANY query, it will automatically send back a small redirect: “TCP is required”.

To understand why this helps prevent attacks we need to understand the following three things.

  1. An ANY query will usually return larger responses as it asks for all records under a particular domain.
  2. 99% of the time, an ANY query is not legitimate traffic. Usually, a host will only want a specific type of record such as A or MX.
  3. Whereas it’s easy to spoof UDP traffic, it’s virtually impossible to spoof TCP. This is because establishing a TCP connection requires a 3-way handshake. For example, if the client says “I’d like to open a connection”, and the server says “Okay, you’d like to open a connection, it’s now open”, then the client says, “Thanks, the connection is now open”. While you can spoof the initiation of the connection, when the server says “Okay, you’d like to open a connection, it’s now open,” the host that has been spoofed will reply “What?! I didn’t ask to open a connection!” and it won’t go any further.

Putting this all together, we can see that this can be a very effective preventative measure for abusing an open DNS resolver. Legitimate clients will fall back to using TCP and attackers will simply give up. We can’t use this for all connections because having to do every DNS lookup over TCP would noticeably slow down internet browsing speed, but we can do this easily enough on connections that have a high probability of being attack traffic.

In a similar vein, another useful option for many DNS servers is the ability to limit the size of a return packet over UDP. Typically, you would configure this to say, “If the return packet is more than X bytes, send a TCP redirect and only allow this over TCP.”

Firewall Limiting of Potential Attack Traffic

In addition to doing the above, we implemented a pure firewall-based approach to throttling attack traffic. To do this, we needed to configure our firewall to be stateless, as we described how to do in a previous post.

As opposed to dnsdist or other frontend servers, this allows you to deploy either on a single server or on a frontend router that covers multiple resolvers. This also should be much more efficient as all processing occurs in-kernel via netfilter rather than having to go through a program which may crash or be somehow limited in the speed at which it can process data. As we showed in a previous post this is very efficient at packet processing.

We start by creating an ‘ipset’ of IPs that we have currently blacklisted. We’ll use the ‘timeout’ option to specify that after we have added an IP into this blacklist, it will automatically expire after a certain time. We’ll also limit it to a maximum 100,000 IPs so that an attacker cannot use this to take our server offline:

ipset create throttled-ips hash:ip timeout 600 family inet maxelem 100000

Then, if an IP is on this list, we’ll block it from doing any UDP traffic to our server:

iptables -t raw -A PREROUTING -p udp -m set --match-set throttled-ips src -j DROP

Now for the clever part: we’ll look for DNS responses that are over a certain threshold packet size (700 bytes) and start monitoring them to see the rate at which someone is sending them:

iptables -N LARGE_DNS_PACKET_TRACKING # Create the destination chain
iptables -A OUTPUT -p udp --sport 53 \
        -m length --length 700:0xffff \
        -j LARGE_DNS_PACKET_TRACKING

This points to a new iptables chain called “LARGE_DNS_PACKET_TRACKING” which we’ll set up as follows:

iptables -A LARGE_DNS_PACKET_TRACKING -m hashlimit --hashlimit-mode dstip --hashlimit-dstmask 32 \
   --hashlimit-upto 50kb/min --hashlimit-burst 10 --hashlimit-name large-dns-packets --hashlimit-htable-max 100000 \
   -j ACCEPT

This first rule allows up to 50kb of large DNS responses per minute to a single IP (the 32 means a /32, i.e. a single IP address), and always allows the first 10 large response packets through. Again, it tracks, at most, 100,000 IPs in order to avoid an attack vector against our server.

After a host goes over this threshold, we’ll pass the traffic through to the next stage of the chain:

iptables -A LARGE_DNS_PACKET_TRACKING -j SET --add-set throttled-ips dstip --timeout 600 --exist

This is where the magic happens. If the client breaches the threshold set above, then it will add its IP to the ipset we created earlier, meaning that it will be blocked for 10 minutes. Finally, let’s note this in the system log and then drop the packet:

iptables -A LARGE_DNS_PACKET_TRACKING -j LOG --log-prefix "DNS-amplification protection: "
iptables -A LARGE_DNS_PACKET_TRACKING -j DROP

Conclusions

With the right protection in place, it’s not such a bad thing to run an open DNS resolver on the internet. If you look in your server’s configuration manual, you should find a few options that can also help in preventing attacks. Additionally, we recommend setting up a firewall-based system like I detailed above so that you can limit the amount of traffic you send out. Otherwise, you may easily find your server being disconnected by your ISP for being part of an attack.