Ripping unfinalized DVDs from Linux

Recently we had some DVD’s with old family videos that had been recorded directly but never finalized, the device that recorded them then broke so it was impossible to finalize them, and it seemed to be pretty much impossible for anything else to read them. So, I figured out a way to recover them using linux…

First I installed the dvd+rw-tools package on ubuntu and used that to get various info and prove that the DVD itself was readable even though nothing on the system could see it as a video disk or filesystem.

$ dvd+rw-mediainfo /dev/sr0 
INQUIRY:                [HL-DT-ST][DVDRAM GTB0N    ][1.00]
GET [CURRENT] CONFIGURATION:
 Mounted Media:         11h, DVD-R Sequential
 Media ID:              CMC MAG. AE1
 Current Write Speed:   8.0x1385=11080KB/s
 Write Speed #0:        8.0x1385=11080KB/s
 Write Speed #1:        4.0x1385=5540KB/s
 Speed Descriptor#0:    00/0 R@8.0x1385=11080KB/s W@8.0x1385=11080KB/s
 Speed Descriptor#1:    00/0 R@8.0x1385=11080KB/s W@4.0x1385=5540KB/s
READ DVD STRUCTURE[#10h]:
 Media Book Type:       00h, DVD-ROM book [revision 0]
 Legacy lead-out at:    2298496*2KB=4707319808
READ DVD STRUCTURE[#0h]:
 Media Book Type:       25h, DVD-R book [revision 5]
 Last border-out at:    8390653*2KB=17184057344
READ DISC INFORMATION:
 Disc status:           appendable
 Number of Sessions:    1
 State of Last Session: incomplete
 "Next" Track:          1
 Number of Tracks:      19
READ TRACK INFORMATION[#1]:
 Track State:           reserved
 Track Start Address:   0*2KB
 Next Writable Address: 0*2KB
 Free Blocks:           2544*2KB
 Track Size:            2544*2KB
READ TRACK INFORMATION[#2]:
 Track State:           complete incremental
 Track Start Address:   2560*2KB
 Free Blocks:           0*2KB
 Track Size:            240*2KB
 Last Recorded Address: 2591*2KB

I then pulled the entire DVD into a file on the local computer for easier processing later. The command will produce lots of errors (as there are parts of the DVD that are not readable as they were never written to), but the output file (image.iso) will contain a full dump of the DVD eventually

dd if=/dev/sr0 of=image.iso bs=2048 conv=noerror,notrunc iflag=nonblock

I then put together a short perl script to search through this file for 1kb blocks beginning with the magic tag DVDVIDEO – these seemed to be the starts of individual chapters, which avconv (also called ffmpeg on some distributions) can then extract into proper video/audio.

#!/usr/bin/perl
use v5.16;
use strict;
use warnings;
my $off = 0;
my $file = $ARGV[0];
open my $fh, '<:bytes', $file or die;
my $buf;
my @pos;

# Search through each block for one beginning with the header text and store these in array of offsets - I think it's one for each track
while( my $len = read $fh, $buf, 1024 ) {
        die if $len != 1024;

        if( $buf =~ /^DVDVIDEO/ ) {
                push @pos, $off;
        }
        $off++;
}
push @pos, $off;

my $chap = 0;
for( my $i = 0; $i < @pos - 1; $i++ ) {
        my $length = $pos[$i+1] - $pos[$i];
        next if $length < 1000;
        $chap++;
        say "dd if=$file bs=1024 skip=$pos[$i] count=$length | avconv -i - -acodec copy -vcodec copy out$chap.mp4";
}

Save that as extract_dvd_tracks.pl and then run it to extract them as files named like out0.mp4. Note that it won’t process tracks that are less than about 1Mb because there seemed to be a number of small sections like this which we wanted to skip over.

perl extract_dvd_tracks.pl image.iso

Job done! Note that there are probably many different formats and layouts for unfinalized DVD’s, this may be just one of many but hopefully the principle remains the same.

Extracting all PHP code from a file

In checking over a project recently, I wanted to extract all PHP code from a set of files and combine it into a single output so I could easily assess what was being used. The eventual command I ended up with was as follows, hopefully it will be useful to someone else in the future:

find -name \*.php | xargs perl -nE 'BEGIN{ undef $/ } say for /<\?php\s*((?:(?!\s*\?>).)+)/sg'

Implementing correct modal navigation with react-router

I’ve recently been converting a big project from jquery mobile into React and Material-UI. One area that seems pretty weak compared to other frameworks is with regards to having a proper mobile-focused infrastructure for navigation. One of the big issues for me was that of modals (for example a dialog, alert or popup page components). For example when you see an alert you want to be able to click on the ok button to dismiss it. If you are on android you also expect to be able to press the back button to dismiss. However if you have separate routes for your modals such that the url changes when they are open, if you refresh the page at that point you will have a modal but no previous state to explore. There seem to be certain hacks with react-router-dom which allow you to change the page but keep the URL the same, assuming you are using BrowserRouter, however because this was a legacy project I want to keep on using HashRouter. So, I whipped up a quick HOC hack to wrap around a modal which will allow both the back navigation to work as expected, and also for refreshes to go to the main page rather than opening the modal.

I already had a standard base class which had the handleClose() method to close off a dialog and signal to the parent that it was done, so I expanded it to include a state listener as below

function getDisplayName(WrappedComponent) {
    return WrappedComponent.displayName || WrappedComponent.name || 'Component';
}

// Shows some sort of dialog which has a handleClose method to close it,
// optionally calling props.onClose and also handles history appropriately
export const DialogMixin = Base => class extends Base {
    displayName = `withDialogMixin(${getDisplayName(Base)})`;

    __close = () => {
        if( window.location.hash == this.__start_hash ) {
            window.removeEventListener('popstate', this.__close);
            this.setState({ closed: true });
            if( this.props.onClose )
                this.props.onClose();
        }
    }

    handleClose = () => window.history.back();

    render() {
        // A component could be mounted but not showing any dialog - only hook
        // the history if actually showed something.
        const render = super.render();
        if( !this.state.closed && !this.__start_hash && render ) {
            this.__start_hash = window.location.hash;
            window.location.hash += '?dialog';

            window.addEventListener('popstate', this.__close);
        }
        return render;
    }
}

You then just wrap your component with this – for example

export const Alert = DialogMixin(_Alert);

This works because react-router-dom doesn’t attempt to parse query strings etc, so when the app is first loaded you want to just have something to remove any of the ?dialog path hacks:

window.location.hash = window.location.hash.replace(/\?.*/, '');

Dumping all remote mysql queries to a server

For a project recently we needed to see which users were accessing which databases on a remote mysql server. After a little bit of reading and experimenting I came up with this command – hopefully it will be useful for someone in the future.

tshark -i any -n \
    -d tcp.port==3306,mysql \
    -T fields -e timestamp -e ip.src -e mysql.user -e mysql.schema -e mysql.query \
    -f "dst port 3306" \
    -Y "len(mysql.user) > 0 || len(mysql.query) > 0" 

This uses the excellent wireshark tool to capture traffic. The -f flag specifies a filter to only inspect inbound traffic to the server (as we don’t care about the responses).

The line beginning -T specifies the fields we wish to dump (in a tab-separated fashion), -d ensures that all traffic will attempt to be decoded as mysql. The final -Y flag ensures that only packets with queries or logins will be dumped, rather than TCP overhead or placeholder binding etc.

Note that user information is only given at the beginning of a session. Schema (database name) information may be on that same line, or you may have to scan the queries to look for a USE database type command as there are two different ways of setting the current database that will be accessed.

How to generate good-looking geographical heatmaps

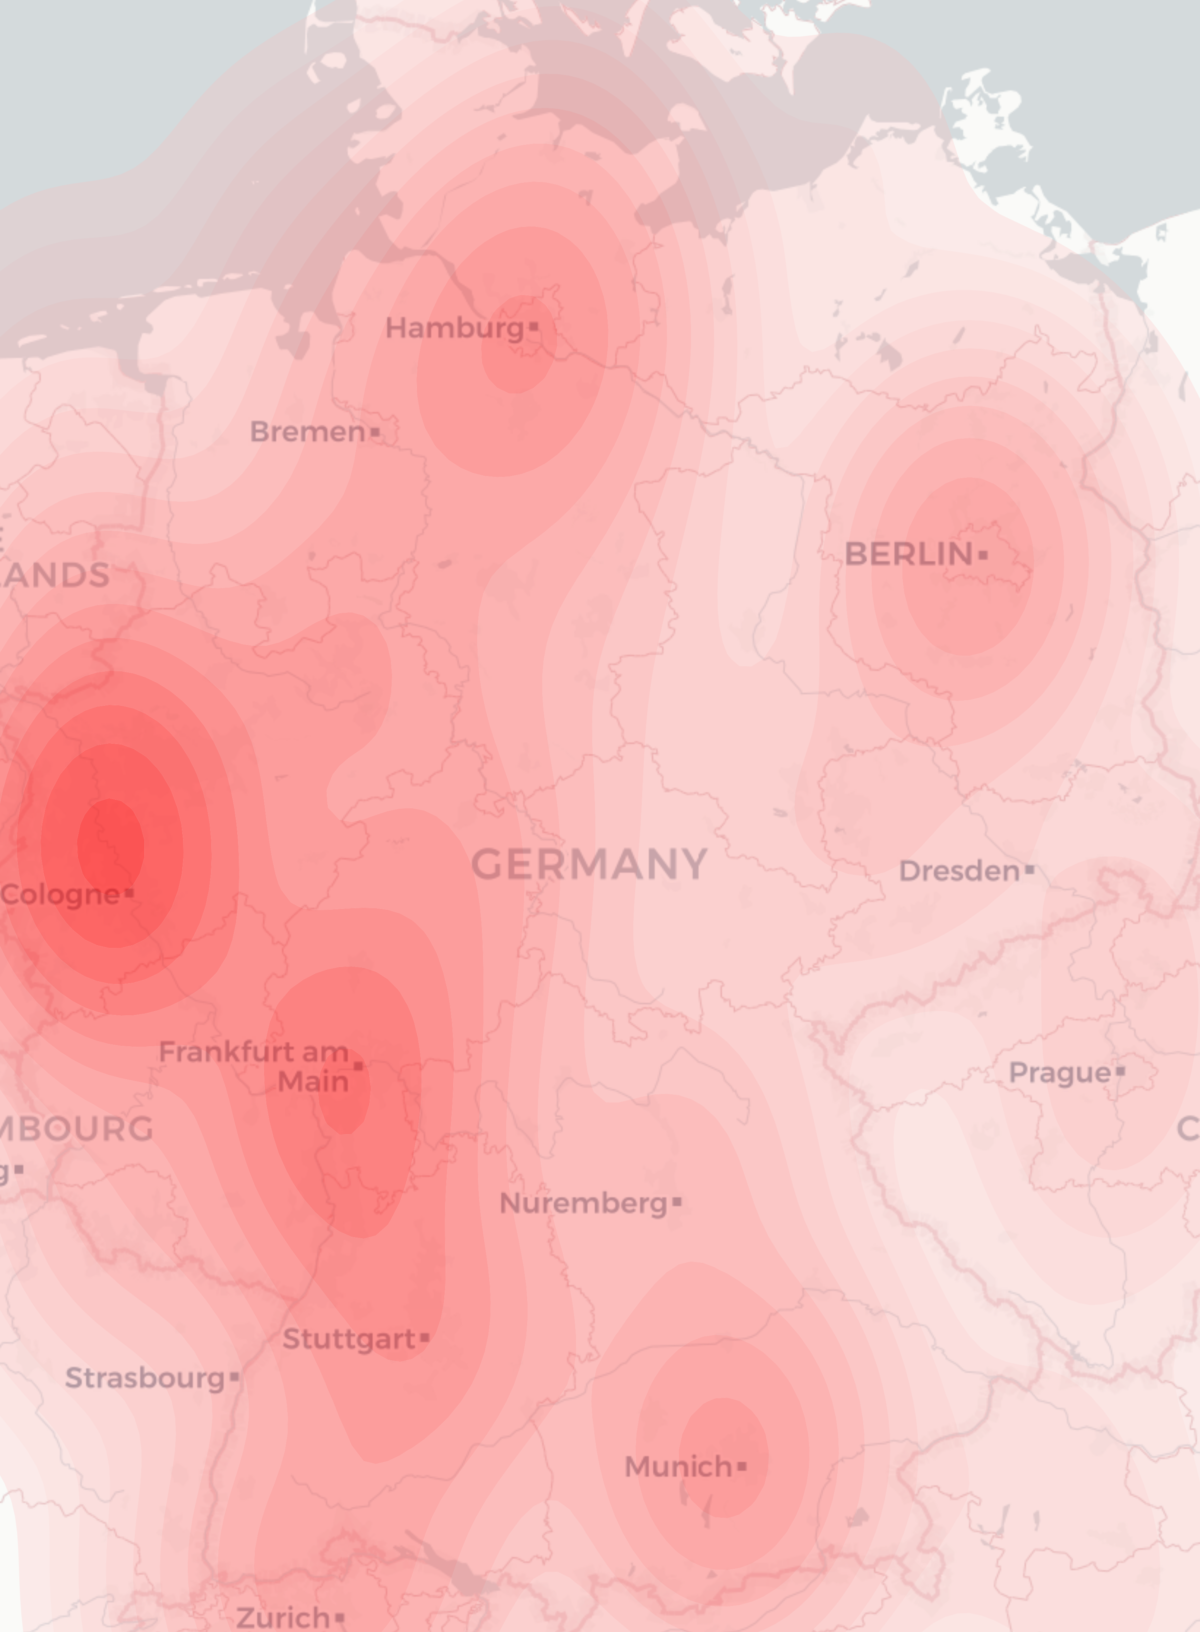
For a project recently I needed to produce a geographical heatmap with millions of data points. I first tried using R with OpenStreetMap rendering, but I couldn’t make the heatmap display as flexibly as I wanted. Then, a friend suggested I try using python with the geopandas library. Even then, inspite of some examples in the manual and even a heatmap-based example, I couldn’t make the map look how I wanted with the interfaces that were exposed.

There were a number of issues:

  • My data was weighted, but there is no support for a weighted heatmap – all points are considered equal
  • I want to have a nicer map which has town names on etc. Ideally the cartodb light style
  • My data was heavily weighted to certain locations, so I wanted to run some logarithmic function on the weights generated by the heatmap algorithm to make the data more easily visible
  • The standard heatmap setup assumes there is nothing other than a map outline so by default is not transparent at all
  • I want to include this data in a report so all I want is a single png image output, rather than having the axis lines, various paddings etc on the graph

So, looking through the geopandas code (which mostly relies on seaborn kdeplot) to generate heatmaps I pulled out various bits into my program so that I could have full control over these processes. Here is a short runthrough of the resulting code:

First, we include libraries, read command-line values and set up the area of our map as a geopandas object

import contextily as ctx
import geopandas
import matplotlib.pyplot as plt
import numpy as np
import pandas
import scipy.stats
import seaborn.palettes
import seaborn.utils
import sys

input_file = sys.argv[1]
output_file = sys.argv[2]
langs = sys.argv[3].split(',')
country_codes = sys.argv[4].split(',')

max_tiles = 10

world = geopandas.read_file(geopandas.datasets.get_path('naturalearth_lowres'))

if country_codes[0] == 'list':
    pandas.set_option('display.max_rows', 1000)
    print(world)
    sys.exit()

# Restrict to specified countries
if country_codes[0] == 'all':
    area = world[world.continent != 'Antarctica']
else:
    area = world[world.iso_a3.isin(country_codes)]

Then, we pull out the bounds both in latlng format and convert the area into Spherical Mercator for web display. We need to plot everything in this so that we can pull in open street map tiles for the background later.

latlng_bounds = area.total_bounds
area = area.to_crs(epsg=3857)
axis = area.total_bounds

# Create the map stretching over the requested area
ax = area.plot(alpha=0)

We now read in the CSV and drop any data that we wouldn’t display:

df = pandas.read_csv(input_file,
    header=None,
    names=['weight', 'lat', 'lng'],
    dtype = {
        'weight': np.int32,
        'lat': np.float64,
        'lng': np.float64,
    }
)

df.drop(df[
            (df.lat < axis[1]) | (df.lat > axis[3]) | (df.lng < axis[0]) | (df.lng > axis[2])     # outside bounds of country
    ].index, inplace=True)

NOTE: I tried doing .to_crs() on the CSV data using normal lat/lng representation to convert into Spherical Mercator but it was very slow. As I’m generating the data itself from PostGIS I just run the conversion in that instead. The data I have is basically using the freely available MaxMind geoip database to generate a list of lat/lng/radius. I then pick a random point within that radius to output to the CSV file using a query like:

SELECT ST_AsText(ST_GeneratePoints(ST_Transform(ST_Buffer(location, radius)::geometry, 3857), 1)), ...

Then comes the hard bit – converting these values into the heatmap using an algorithm called KDE. These bits were lifted and simplified from the kdeplot routines mentioned above, but fortunately although not exposed by seaborn the underlying scipy.stats module contains a weighted KDE which is easy to use.

# Calculate the KDE
data = np.c_[df.lng, df.lat]
kde = scipy.stats.gaussian_kde(data.T, bw_method="scott", weights=df.weight)
data_std = data.std(axis=0, ddof=1)
bw_x = getattr(kde, "scotts_factor")() * data_std[0]
bw_y = getattr(kde, "scotts_factor")() * data_std[1]
grid_x = grid_y = 100
x_support = seaborn.utils._kde_support(data[:, 0], bw_x, grid_x, 3, (axis[0], axis[2]))
y_support = seaborn.utils._kde_support(data[:, 1], bw_y, grid_y, 3, (axis[1], axis[3]))
xx, yy = np.meshgrid(x_support, y_support)
levels = kde([xx.ravel(), yy.ravel()]).reshape(xx.shape)

The levels output variable is then the weights of all points on the heatmap we are going to output. We can apply a mathematical function to this (in this case take the quintic root) in order to scale the data appropriately, and output:

cset = ax.contourf(xx, yy, levels,
    20, # n_levels

    cmap=seaborn.palettes.blend_palette(('#ffffff10', '#ff0000af'), 6, as_cmap=True),
    antialiased=True,       # avoids lines on the contours to some extent
)

By generating a palette ourselves we can add an alpha channel to each aspect so that the underlying map will be visible. However there is quite a lot of noise at the lower levels so we want to hide all of them completely:

# Hide lowest N levels
for i in range(0,5):
    cset.collections[i].set_alpha(0)

We then add in the OSM base tiles, which is a bit of a mess as the contextily library seems a bit immature:

def add_basemap(ax, latlng_bounds, axis, url='https://a.basemaps.cartocdn.com/light_all/tileZ/tileX/tileY@2x.png'):
    prev_ax = ax.axis()
    # TODO: Zoom should surely take output pixel request size into account...
    zoom = ctx.tile._calculate_zoom(*latlng_bounds)
    while ctx.tile.howmany(*latlng_bounds, zoom, ll=True) > max_tiles:      # dont ever try to download loads of tiles
        zoom = zoom - 1
    print("downloading %d tiles with zoom level %d" % (ctx.tile.howmany(*latlng_bounds, zoom, ll=True), zoom))
    basemap, extent = ctx.bounds2img(*axis, zoom=zoom, url=url)
    ax.imshow(basemap, extent=extent, interpolation='bilinear')
    ax.axis(prev_ax)        # restore axis after changing the background

add_basemap(ax, latlng_bounds, axis)

Finally we can tweak some of the output settings and save it as a png file:

ax.axes.get_xaxis().set_visible(False)
ax.axes.get_yaxis().set_visible(False)
ax.set_frame_on(False)

plt.savefig(output_file, dpi=200, format='png', bbox_inches='tight', pad_inches=0)

The hardest task to do well in every frontend/backend system – paging

What is the hardest code to write efficiently in pretty much every frontend and backend system? I think it is paging.

Nearly every system I’ve worked on as full-stack developer has had some sort of reporting whether it is searching and filtering or news-feed style item display, all of these depend on paging. Whilst simple paging is trivial to implement, making it work quickly at scale is a very tricky challenge.

A simple approach (based on SQL, but could be with any backend data store) would be something like:

items = SELECT * FROM <table> WHERE <query> ORDER BY <order> LIMIT <rows>,<offset>;
count = SELECT COUNT(*) FROM <table> WHERE <query>;

It looks simple and it works in small-scale development systems. But there a massive number of issues and inefficiencies with this approach:

  • Whilst you need to redo the items query for every page, the count query only needs to be done once for each <query>. Counting is a very expensive operation as it essentially has to fetch all the rows, unless there are some very well optimized keys on your table. This especially the case if you are running over a table larger than a few megabytes on a mobile device, so you need to cache this as much as possible.
  • Often times as the <order> logic has gotten more and more complex I’ve found myself in a situation where some rows are equal in ordering and so they can move around as you switch between pages or redo the query. Always ensure that the last item of ordering is something which is well ordered to avoid this, for example an integer primary key
  • What happens with a LIMIT/OFFSET type query if you get a row inserted before the OFFSET? All the rows shift forwards by one so when you scroll down on your infinite feed you get a duplicate, or the user goes to the next page and sees a repeat of the last entry of the previous page. What happens when a row prior to the OFFSET is deleted? A row between the pages is not seen by the user. In some databases it may be possible to use a long-lived cursor but often in stateless backends for webapps this is not possible. Wherever possible you should try to get a column on the <order> which is simply increasing or decreasing and redo the previous query with use a > against that to ensure you fetch all the rows from the previous point the user saw regardless of what changed above it. This is easy when sorting by primary key, difficult or even impossible otherwise.
  • How do you handle a laggy backend when the user presses the next button multiple times? Does it re-fire the request for the next page multiple times to the backend (consuming unnecessary resources), ignore any presses after the first (better), or does it proceed forward multiple pages, potentially running past the last page and onto blank pages? I’d usually opt for the second approach but limiting so that it always stops on the last page, but it may vary depending on usage case (would users typically want to skip multiple pages quickly, or always want to page through one-at-a-time), backend latency (ie is the data stored locally or remotely, what is the connectivity like)
  • Following on from the above, if you are firing multiple requests for pages, or for infinite scrolling how do you cope with the fact that responses can come back out-of-order? Many times I see it would simply display the content from the last page returned, but this is open to a number of bugs if you are talking about remote services over wireless
  • How do you efficiently abort in-fly calls and database queries if the user changes page – on a large system this could be a significant performance gain

There are quite a large number of optimizations that can be done with paging code, whether this is with a remote backend or locally, for example:

  • Prioritize getting the first page of data to display, say “Showing results 1-50 of …” while the count is loading
  • Track historical data on how long it takes to generate counts or paging, and especially if running single-threaded (eg on a mobile device), delay the count until the main queries have completed and there is some idle time
  • Is it possible to parallelize the two querys against the database so that the query takes half the real-time for the user? Can you use non-blocking IO to open two database connections, one for each query and return a response when both have completed? Can you run 2 separate queries one for count and one for items and update your pager and results separately? For a few rows in a test system this won’t make any difference, but over millions of rows, especially if you need an accurate count, this can save seconds of time
  • Do you actually need a totally accurate count, or can you approximate it, does your database backend support something like this for queries? This can save significant time and resources
  • Have you set up good indexes and verified that they are correctly being used at the scale that you will have in your live environment? Do you optimize well for the common use case?
  • You don’t always need to bother running a count query – if the items returned are less than the items requested you know that you have finished paging and you can automatically count the total from that. This is true whether on the first on the 100th page.
  • Fetch the number of rows that you want to display plus one, so that you know if there is a next page or not. If the number of items is less than you requested you know there won’t be a next page no matter what the total actually is
  • If running on mobile devices or html, limit the number of items that are displayed on an infinite scroller as this can be very memory intensive. Perhaps allow infinite scrolling over 500-1000 rows and then put a next button at the bottom of the page. Or you can do some trickery to replace the top items with a large blank box but this can be very complex and difficult to do well
  • Don’t display a spinner when infinite scrolling (you are starting to load more items before the user hits the bottom of the list right?) Only display the spinner after a short time period or when the user hits the very bottom of the list to give visual feedback that there are more items loading to display

If this looks like a lot to think about, I don’t disagree. Simple, buggy and inefficient paging is easy to do, but fully-optimized, highly responsive complex paging is very tricky to do well. But if you want to scale your app you need to focus on this.

Creating flexible highlight rules in Ace that change according to editor mode

I’ve only recently started using the excellent Ace editor in projects, but I’m really enjoying it so far. It has very flexible and well designed custom highlighting rulesets that developers can extend to various different syntax. However it does not currently support in-editor spell-checking (I believe this functionality is planned for a release soon though – hopefully!).

One of the situations I’m using the editor in is site which has input from many different languages and character sets. As part of this I wanted to ensure that the language that a given article is claimed to be written in matches the character set of various content sections of the editor. For example if the article is in Thai, but you are using Latin script characters it should highlight them as errors. A big issue we have is that there is a lot of Cyrillic content, but as a number of characters render the same or very similarly in Cyrillic and Latin (for example Р and P), some of the users input mostly Cyrillic, but with the occasional character of Latin. This wouldn’t be a problem if we were just rendering the text, but we are also unidecoding it for searching – in this case Latin P goes to p, but the Cyrillic character Р encodes to r (as it is pronounced). This means that it throws off the searching.

I wrote a script which parses the CLDR data’s exemplarCharacters data to get the expected character sets for a language, adds a few in (as the CLDR is not totally complete unfortunately, especially for languages that use extended Cyrillic sets such as Karakalpak, lacks Traditional Mongolian entirely, and is incomplete for some ideographic languages such as Chinese). It then adds some general punctuation and other characters and generates a javascript regexp for matching characters that should not exist. For example for Armenian, the regexp is /[^\u0020-\u0022\u0025-\u0029\u002b-\u003b\u003f\u005b-\u005d\u00ab\u00b4\u00b8\u00bb\u0531-\u0556\u055a-\u055f\u0561-\u0587\u058a\u2030]/.

So far so good, but how to integrate this with Ace editor? Usually you only have a mode for Ace which specifies the language (eg PHP, HTML), but I don’t want to create a new mode for each language/script that this app wants to support.

Initially I tried basing some code on this code which adds spell checking outside of Ace, however there are a number of limitations with this approach namely it doesn’t integrate with the existing highlighting system so if you are mean to be editing eg HTML document containing only Thai characters it doesn’t know which parts are HTML and which parts should be checked, without redoing the whole highlighting run a second time. It is also needs to reprocess the entire document every change.

Digging around in the Ace source I found that you can actually pass an object into the setMode function which enables you to pass new parameters, such as the invalid-characters regexp for the current language. However the highlighting functions are usually static which means it is complex to update this on-the-fly, especially after normalizing it for something based on the Text Highlight Rules. My solution is as follows:

define('ace/mode/my_highlight_rules', ... {
    var MyHighlightRules = function(regex) {
        var rules = function () {
            this.$rules = {
                start: [ ... ],
                words: [ ... something with regex ... ],
                ...
            this.normalizeRules();
        };

        rules.metaData = { ... };

        oop.inherits(rules, TextHighlightRules);
        return rules;
    };

    exports.MyHighlightRules = MyHighlightRules;
});

define("ace/mode/my_mode", ... {
    var Mode = function (opts) {
        this.HighlightRules = MyHighlightRules(opts.regex);
        ...
    };
});

You can then just do .setMode({ path: 'ace/mode/my_mode', regex: /.../ }) changing the regex for each different language or character set that you wish to validate.

Recovering from unmountable btrfs filesystem issues

Here are some notes of how I recovered most of the data after my btrfs disk got horribly corrupted by bad memory. Fortunately I had upgraded the disk 6 months ago so I was able to start from that image left behind on the old disk, copied over using the excellent btrfs-clone tool.

After that I could restore most of my files to the last backup (a month or two back) and git repositories from the main server. But I still had a number of documents and other bits that I needed to recover.

The first thing prior to formatting the disk (I don’t have another spare fast SSD lying around) was to take a backup of the entire btrfs disk. However it was quite a bit larger than I easily had spare on another disk. So, I stored it in squashfs which reduced size by 50%.

mkdir empty-dir
mksquashfs empty-dir squash.img -p 'sdb3_backup.img f 444 root root dd if=/dev/sdb3 bs=4M'

After that I tested that it was mountable:

mount squash.img /mnt/tmp
btrfs restore -l /mnt/tmp/sdb3_backup.img

And erased and cloned the old btrfs disk to it.

I then started using the btrfs restore tool to try to recover the data. First you need to list the roots, usually the highest number will be the latest snapshot and it may have consistent data:

btrfs restore -l /mnt/tmp/sdb3_backup.img

Then you can get a listing of the files under that root and whether they may be recoverable using the -v -D flags (-v means list files, -D means don’t actually try to restore any data. For example:

btrfs restore -r 290 -v -D sdb3_backup.img /laptop/restore/

If that looks good then you can run the command with a few extra flags to try to get the files back as much as possible:

btrfs restore -r 290 -x -m -i sdb3_backup.img /laptop/restore/

This can take a while but it seems to work well on smaller files. Unfortunately some virtual machine images (60gb or so each) didn’t recover because they had got corrupted in the middle.

If you want to recover only a particular point under the tree you can use the --path-regex parameter to specify this, however writing the regexps is very difficult. Here is a short bit of code which will generate the path regex correctly:

perl -E 'for(@ARGV){ $p = () = m!/!g; s!/!(|/!g; $_.= "(|/.*))" . ")" x $p; say "--path-regex '\''^/(|$_\$'\''" }' 'mark/data/documents'

You can then restore just those files like:

btrfs restore -x -m -i  -r 290 --path-regex  '^/(|mark(|/data(|/documents(|/.*))))$' sdb3_backup.img /laptop/restore/

Diagnosing faulty memory in Linux…

For the past year I’ve had very occasional chrome crashes (segfaults in rendering process) and an occasional bit of btrfs corruption. As it was always easily repairable with btrfs check --repair I never thought much about it, although I suspected it may be an issue with the memory. I ran memtest86 overnight one time but it didn’t show up any issues. There were never any read or SMART issues logged on the disk either, and it happened to another disk within the machine as well.

Recently though I was seeing btrfs corruption on a weekly basis, especially after upgrading to ubuntu 18.04 (from ubuntu 16.04). I thought it may be a kernel issue so I got one of the latest kernels. It seemed to happen especially when I was doing something quite file-system intense, for example browsing some cache-heavy pages while running a vm with a long build process going on.

Then, earlier in the week the hard drive got corrupted again, much more seriously and after spending some time fixing, running `btrfs check –repair` a few times it suddenly started deleting a load of inodes. Force rebooting the machine I discovered that the disk was un-mountable, although later I was able to recover quite a lot of key data from btrfs restore as documented in this post.

memtest86 was still not showing any issues, and so my first thought was that assuming the hard disk was not at fault it may be something to do only when the memory had a lot of contention (memtest86 was only able to run on a single core on my box). I booted a minimal version of linux and ran a multi-process test over a large amount (not all) of the memory:

apt -y install memtester
seq $(nproc) | xargs -P1000 -n 1 bash -c 'memtester $0 10; E=$?; [[ $E != 0 ]] && { echo "FAILURE: EXIT status: $E"; exit 255; }' "$((($(grep MemAvailable /proc/meminfo | awk '{print $2}') / 1024 - 100) / $(nproc)))"

and check for FAILURE in the log messages, it likely also shows in dmesg, and may only show there if you have ECC RAM.

This will run a process per CPU aiming to consume pretty much all of your available memory. 10 is the number of test cycles to run through. In my case 8 cores and 16gb memory = 1400mb per memtester process. It took about 45 min to run once over the 16gb, or about 25 min to run over 8gb (each of the individual sodimms in my laptop).

Within about 10 minutes it started showing issues on one of the chips. I’ve done a bit of research since this and seen that if a memory chip is going to fail then it would usually do it within the first 6 months of being used. However this is a kingston chip that has been in my laptop since I bought it 2 or 3 years back. I added another 8gb samsung chip a year ago and it seemed to be after that that the issues started, however that chip works out as fine. Perhaps adding another chip in broke something, or perhaps it just wore out or overheated somehow…

ESP8266 minimal setup

I’m sure there are many notes out there, but I often get confused about the minimal setup required to run an ESP8266. You actually only need 4 pins connected: Connect GND to 0v, VCC and EN to +3.3v. Then connect GPIO15 via a 2-10k (I usually use 3k3) resistor to GND to specify boot from flash. And you’re good to go. Obviously in order to do the initial flash of the device you need to connect the TX/RX and also connect GPIO0 to GND.